Table of Contents
A Definitive Guide on Querying API Using GraphQL in Python
Introduction
Did you just start working on an exciting project that involves pulling data from an API? If so, the API you are interested in might be a GraphQL API. These APIs are very useful and versatile. However they can be confusing for a beginner. Fortunately, you came to the right place! In this guide I will show you how to easily make a GraphQL API request in Python!
GraphQL APIs can be incredibly efficient and useful, but I find that most of the available documentation is not very beginner friendly. Moreover, this type of API is known to have a steep learning curve. Thus, I created this beginner friendly, step-by-step guide on how to query GraphQL APIs in Python.
We will be working through an example of how to request data from Charitybase GraphQL API. First however, I will cover some background information on GraphQL and APIs. If you wish to skip past the background info and get straight to it, go to the “How to Query GraphQL API in Python” section!
What Is a GraphQL API?
What Is an API?
API stands for Application Programming Interface. When we as humans communicate with each other, we follow a plethora of rules. We know not to interrupt when someone else is talking, we wait for our turn to speak and we know the rules to create a question which will request an answer from another human being we speak to. Even in written communications, we follow guidelines in terms of the language and layout we use. We know that if we put together seemingly random characters of a colon and close bracket, we are conveying a smile to the recipient.
Well, API is essentially a communications guideline, but for computers. API to a large extent dictates how machines read, interpret and write data. Thanks to API, a user can easily use their machine to request data stored on someone else’s machine. Another way to think of APIs is essentially a machine friendly method of communication. Whilst APIs have many uses, for now we are focusing on the most obvious use, where the user can request, store and amend data stored elsewhere. In the day of cloud storage and data revolution, APIs play a huge role! In fact, businesses spend over $590 billion dollars on the implementation of APIs into their systems. Moreover, there are many amazing publicly available APIs that any data professional, or enthusiast can dig into!
APIs are a relatively young technology, which has not yet been standardised fully and thus it seems there are many types of APIs floating about. Some well-known ones include REST, SOAP and GraphQL. Each of those comes with its discrete advantages and disadvantages. This is certainly a topic deserving its own post at some point in the future! The presence of multiple API formats and within those formats multiple ways these can be applied means that every API you come across will work slightly differently.
What Is GraphQL API
GraphQL is a query language developed internally by Facebook in 2012 and released to public in 2015. Its main aim was to create a more efficient method of transferring data. Thus, GraphQL API was born.
GraphQL API comes with many advantages in terms of efficiency of data transfer compared to its REST counterpart. GraphQL API provides a very structured way of transferring data. It relies on schema structure, which encodes for every table and “column” of data in a logical, nested structure. It essentially is a scheme by which you can narrow down to the exact data you need. This makes GraphQL very efficient, as user can simply request / submit the exact columns they are interested in. In REST APIs, users generally have to request a full table of data with lots of redundant columns which unnecessarily increase the amount of data transferred putting servers under greater pressure.
However, GraphQL APIs might take a while to get your head around and users are known to complain about its steep learning curve. Moreover, I find a lot of the available documentation on GraphQL is not very beginner friendly and may be frustratingly difficult for those with little experience in APIs.
GraphQL in Python
GraphQL is a querying language specifically developed to the needs of this new way of developing and using APIs. This however, means that in most of cases we will not be able to create entire apps and workflows purely within GraphQL. We need to integrate the GraphQL API calls in a more generalist language like we would with most other API types. This however, can be incredibly frustrating if you have never done this before.
Hence, I embarked on a mission to provide this beginner friendly guide for you on how to create a working Graphql API request in Python! In terms of the more versatile languages, I know there is a way to achieve this in R and Python. Whilst R has a GraphQL client package, I found it difficult to work with. On the other hand, Python provides a very straightforward method of requesting data from GraphQL API.
For this guide, you will need very little background knowledge of Python and access to internet (duh). That’s it!
How to Query GraphQL API in Python
What Will We Do?
We will pull data on every charity operating in the UK that makes grants to other charities and bodies that are aligned with their cause. We will also ensure every charity we pull data on focuses on the relief of poverty. The data we want on those charities is a summary of activities, contact data and financial data.
Great! So, where do we even get this data from? The answer is Charitybase UK. This is a fantastic website developed by Dan Kwiatkowski and it is an absolute treasure trove of data on charities operating in the UK. The website provides developers with GraphQL API that can be used to pull data.
How Will We Query the GraphQL API?
In order to query the API, we will follow this general game plan.
- Learn about the Charitybase API and its schema
- Build a GraphQL query
- Develop a python-based API call
- Wrangle data and flatten json files
- Develop a loop for calling large quantities of data
First, we need to learn about this particular API. As I mentioned, each APIs varies slightly with different structures and requirements.
Then we will move onto building the GraphQL query that will tell the server over at Charitybase which data we want provided and how we want to filter it.
Once we have a working query, we will build the whole API call in Python.
Then we will wrangle the data using Pandas package in Python and output the final data to a CSV file that can be easily accessed and used.
Finally, since there is a limit set by Charitybase on how much data we can pull with a single call, we will then have to develop a loop in Python to run multiple API calls and provide us with a complete dataset.
As you can see, we have quite a lot to do, but don’t worry! I will walk you through every step of the way. Let’s get to it!
Learn About the Charitybase API and Its Schema
First let’s head over to Charitybase and we will see what we can learn about the API. On the “Getting Started” page we can straightaway see that we will need to use headers to specify the format we want the data in and API key. Headers in context of APIs are essentially initial options we pass to the server.
Since we need an API key, we will need to set up an account with Charitybase and create an API key.
The site also tells us we have a single endpoint through which we call an API. What does that mean? This means all of our API calls can use that single URL, or a version of it.
We can tell from the page that we can call data using GET and POST requests. GET request means we are directly requesting data. POST request normally means that we can upload data to the server. Now, POST in this case can also be used to request data, as you can essentially upload a query string that prompts the Charitybase API to return data to you.
Finally, we need to learn how to build valid GraphQL queries for this API. For this, charitybase provided us with a fantastic playground tool, where we can explore the GraphQL structure and build our own query!
How to Build a GraphQL Query
Let’s go over to the playground. Log in when prompted and select the previously generated API key.
Firstly, we need to understand the schema. Essentially, we need to understand how the API is structured, which will allow us to accurately specify the data we need. To do this, click the Docs tab in the top right corner of the page. There you will see the root types tab. This is the root of the entire structure. We can see in our case the root is called Query. Let’s click on it. Then click through the next step in structure QueryCHC.
Here things start to become interesting, as we have getCharities and getFilters. It is at this point where we start querying which charities are of interest to us. Note that getCharities option has a specific syntax that needs to be adhered to make the query work. Looking closer at the getCharities option we can see that this option will allow us to pick charities of interest using a range of filters. We can see what filters we can use on the FilterCHCInput option. After we specify filters, we can use the FilteredCharitiesCHC option to specify the fields of data we want supplied to us. In a nutshell this structure allows us to tell Charitybase which charities we are interested in and then what data we want on those.
The exact way we build this query will become apparent as we go on. Note that if the API you are working on does not have a built-in query explorer, you can apply similar method by consulting the website API documentation and using the GraphiQL solution.
So, let’s start building the query!
Due to the complex GraphQL query structure, it is best to start with a simple query and build on it step by step whilst checking whether it works. And this is exactly what we will do.
Let’s start with the simplest query below.
query {
          CHC {
            getCharities(filters: {
              search: "Oxfam"

            }) {
              count
            }
          }
}
As you can see the GraphQL queries follow this json-like nested structure. We start with the root of the query and work down the levels to specify the data we want. We separate nesting levels with the curly brackets. Once we get to the getCharities command, we simply follow the syntax outlined in the query explorer and we input search: “Oxfam” as a filter. This is to just establish that our filtering method works and we will change this soon.
The second part of this query, after the getCharities bracket close states the outputs we want. For now we just put down count. This will give us a count of charities that satisfy the filter we applied. Sure enough, we get 8 charities returned when we run the query!
Now that we have a basic query working, let’s build it up! Let’s try to include all the outputs we want instead of just a count.
query {
          CHC {
            getCharities(filters: {
              search: "Oxfam"
            }) {
              count
              list(limit: 30
              skip: 0) {
                id
                names {
                  value
                  primary
                }
                activities
                operations {
                  id, name
                }
                causes {id, name}
                contact {address, email, phone, postcode, social {
                  platform
                  handle
                }}
                finances {
                  income
                  spending
                }
                registrations {registrationDate, removalDate}
              }
            }
          }
        }
Now this will provide us with much more data! Let’s recap what we did here. We followed the syntax of query explorer to throw in some more useful outputs that we want. All outputs are contained within the output curly bracket (the one after getCharities) close bracket. Again, curly brackets are used to nest the outputs correctly. Note that in some cases we need the id and value outputs. This will become very important soon, as this way we can overcome a certain quirk in this API. We can see all the outputs in the right pane. It should look something like this.
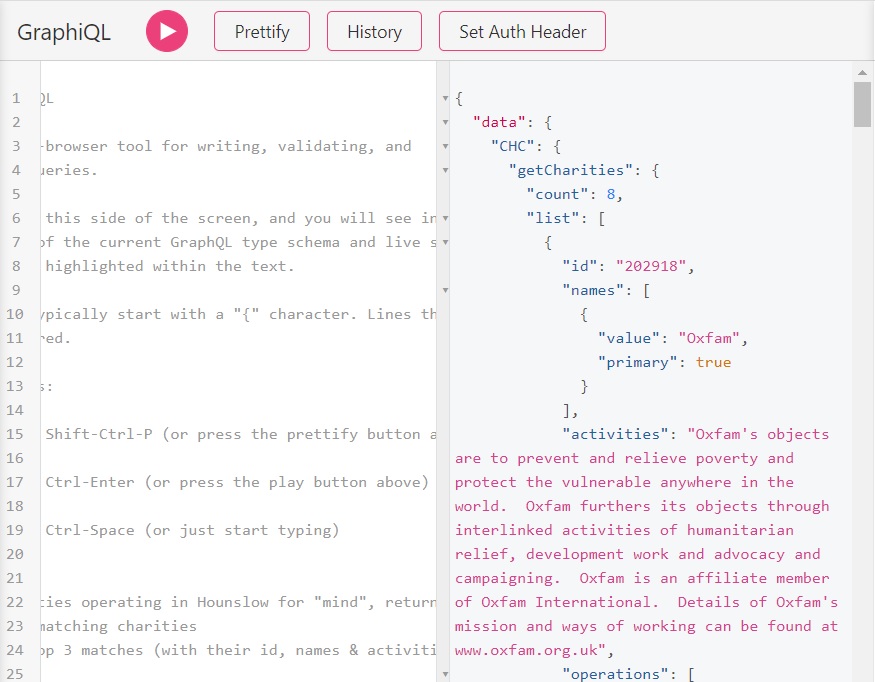
See how those quirky ID plus value fields return us an ID number and a readable value this ID stands for. This will become important soon!
Now that we have the outputs sorted, let’s sort out the charities we filter for. As previously mentioned, we need charities that make grants to other organisations and focus on relief of poverty. Now let’s look again at the query explorer in the getCharities, filters, filterCHCInputs section. Both causes and operations take pre-defined listed inputs. We can further determine AND, OR, or AND NOT conditions to further modify our filter using every, some and notSome statements respectively.
However, when we try to input causes: {every: ["The Prevention Or Relief Of Poverty"]} in the cause filter, we will get an error. Why? Well, this is the quirk of the API I was talking about. When we state the filters, the API takes an ID of the cause, not the actual value of the cause! The same goes for most of the other filters that use listed inputs. Well how do we find the underlying IDs behind the values we want?
The simplest way I found is to run the query we already built on charities that will have those values (such as Oxfam). So, we run a query on Oxfam search, with IDs listed at outputs and this is what we get.
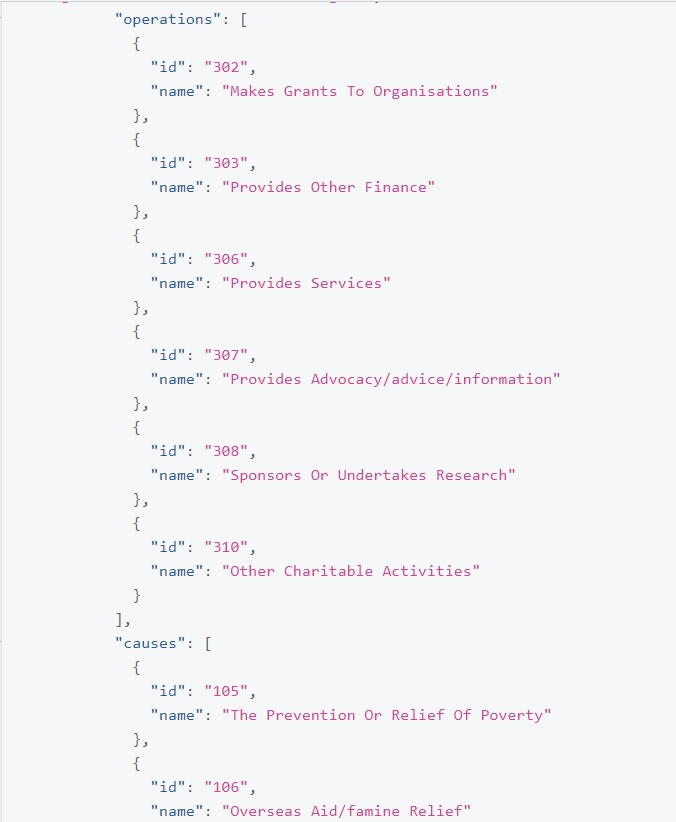
As you can see, for causes we need an ID of 105 and for operations we need an ID of 302. Now we can plug in those values into our query and this is what we should have.
query {
  CHC {
    getCharities(filters: {
      operations: { every:["302"]}
      causes: {every: ["105"]}
    }) {
      count
      list(limit: 30
      skip: 0) {
        id
        names {
          value
          primary
        }
        activities
        operations {
          id, name
        }
        causes {id, name}
        contact {address, email, phone, postcode, social {
          platform
          handle
        }}
        finances {
          income
          spending
        }
        registrations {registrationDate, removalDate}
      }
    }
  }
}
We are almost there! Query returns outputs we want filtered in the way we want. Only thing left to do is to comment out the causes output, as we are not interested in pulling data on causes, as we know the cause the charities were filtered by. The final query should look somewhat like this!
query {
  CHC {
    getCharities(filters: {
      operations: { every:["302"]}
      causes: {every: ["105"]}
    }) {
      count
      list(limit: 30
      skip: 0) {
        id
        names {
          value
          primary
        }
        activities
        operations {
          id, name
        }
        #causes {id, name}
        contact {address, email, phone, postcode, social {
          platform
          handle
        }}
        finances {
          income
          spending
        }
        registrations {registrationDate, removalDate}
      }
    }
  }
}
As you can see the playground area implemented by Charitybase and many other GraphQL APIs is very useful for building queries. Also, my advice is to be careful with the syntax of the query as the nested, bracket-based structure can lead to easy mistakes. This underlines the importance of proper exploration of a query structure before we begin to write one.
So now we have our query, let’s implement it into a Python script to develop an automated pipeline!
GraphQL in Python
Now is the time to perform the API call of GraphQL in Python. Let’s start off with importing certain libraries we will need as shown below.
import json
import pandas as pd
import requests
from pandas.io.json import json_normalize
from pandas import DataFrame
Most notably, we will use the requests package that will allow us make an API call.
Now that we have all the libraries we need, we can begin!
We need to set up the GraphQL query within our Python script. This is relatively simple and we will simply pass the entire query we created in GraphQL to a query variable in Python as below!
query = """ query {
  CHC {
    getCharities(filters: {
      operations: { every:["302"]}
      causes: {every: ["105"]}
    }) {
      count
      list(limit: 30
      skip: 0) {
        id
        names {
          value
          primary
        }
        activities
        operations {
          id, name
        }
        #causes {id, name}
        contact {address, email, phone, postcode, social {
          platform
          handle
        }}
        finances {
          income
          spending
        }
        registrations {registrationDate, removalDate}
      }
    }
  }
}
"""
Now we will set up the URL to which we will make a call by once again, passing URL to an URL variable as shown below. We are passing these lengthy strings to variables to keep things nice and tidy. This in turn will help us avoid problems in the future.
url = 'https://charitybase.uk/api/graphql'
Once we have the URL all set up we can move on to setting up headers as instructed by the API developers on Charitybase. We need to specify the output format we want and our API key. To do this, we need to create a python dictionary that we will call headers like below. Here it is important to follow API developer’s instructions to ensure your header is written correctly.
headers = {'content-type': 'application/json',
           "Authorization": "Apikey YOUR KEY"}
Now we have Query, URL and headers all set up in Python. This means we have all of the request components set up and we are ready to make the request! This is where the requests library comes in handy. We will be performing a POST request, where we will essentially upload the query in JSON-like format to Charitybase server, which will then read the request and return output to us in JSON format.
To make the request we simply use the requests.post command followed by the URL, query and header like below. Note that we are passing this to a variable “r”.
r = requests.post(url, json={'query': query}, headers=headers)
We also added the print(r.status_code)and print(r.text)commands. These commands let us check whether the request worked correctly and print the (currently messy) output respectively. Hopefully the status code returns the 200 code which means we are good to go!
print(r.status_code)
print(r.text)
Well done! You officially finished your first GraphQL API call in Python! But we cannot end here just yet! The output is very messy, meaning we need to wrangle the data into a more usable format and then we need to create a loop that will run the API calls repeatedly to obtain all data, not just the top 30 results.
How to Wrangle Our Data and Flatten JSON Files
The output we get is in JSON format, which is commonly seen in the world of data and development. The format follows a logical nested structure in much similar way our GraphQL query did. While JSON format is useful in many ways, we would prefer a nice and clean table that we can get in CSV format.
First let’s have a look at our output.
![]()
As you can see the raw output is a JSON in a single line. We can also see that in this case the JSON is heavily nested. We now need to “flatten” the output. This basically means we need to remove the multiple levels of nesting. The usual flattening functions commonly used in Python seemed to work poorly in our case due to heavy nesting.
To solve this problem, we need to pull out the big guns! Luckily I found a function that will flatten even the most difficult of JSONs. See below.
def flatten_json(y):
    out = {}

    def flatten(x, name=''):
        if type(x) is dict:
            for a in x:
                flatten(x[a], name + a + '_')
        elif type(x) is list:
            i = 0
            for a in x:
                flatten(a, name + str(i) + '_')
                i += 1
        else:
            out[name[:-1]] = x

    flatten(y)
    return out
Now that we flattened the JSON properly, we can use the following two functions to convert the output into a proper Python Pandas data frame for further wrangling.
json_data = json.loads(r.text)
flat = flatten_json(json_data)
df_data = json_normalize(flat)
df = pd.DataFrame(df_data)
Let’s have a look at an output.

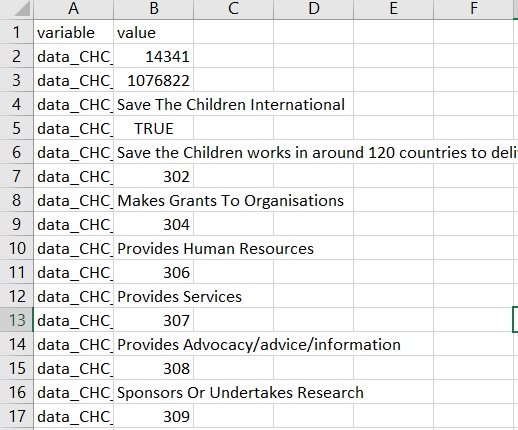
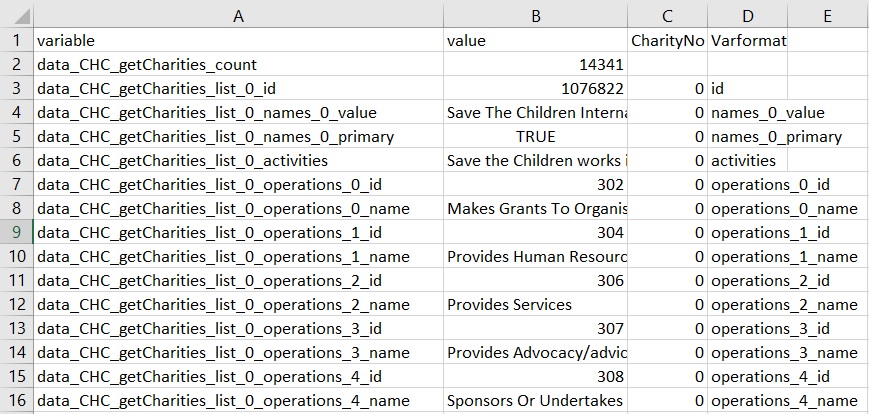
Now we can see what happened here. We only have two rows with what essentially are dictionary pairs. However, we only want a single column of each type for each type of data with additional charities coming up in additional rows, instead of additional columns. To begin this, let’s use melt function that will bring together all the columns into a one column listing all the variables and all the values in another column listing all our values.
df = pd.melt(df)
This is what we should get
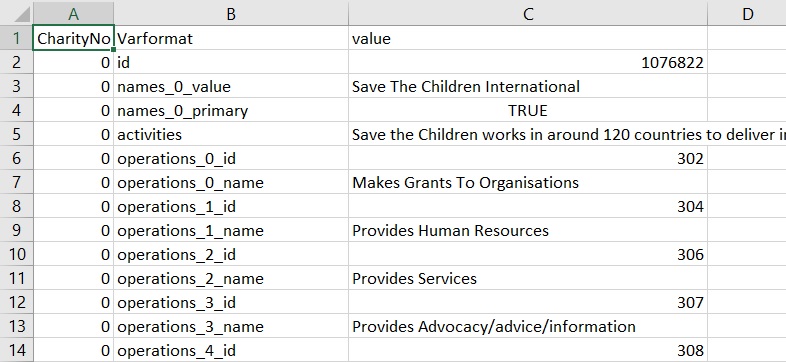
Ok, so our plan has worked! What do we need to do next? Well, we need to ensure all our future columns have the same names for us to lay them out correctly. Right now, all our variables have different names as a new variable with unique number was created for each charity we have extracted. To do this we will apply following functions.
df['CharityNo'] = df.variable.str.extract(pat='list_(\d*)_')
df['Varformat'] = df.variable.str.extract(pat= 'data_CHC_getCharities_list_[0-9]*._(.*.)')
This is what we should see.
Let’s have a quick look at what we did. The first line of the code captures the number of the charity and the second line captures the name of the actual variable. The script then saves both as CharityNo and Varformat respectively.
We are almost done, before we finally create the columns we want, let’s just quickly clean up the data by retaining only the new columns we created, removing NAs and removing duplicates.
df = df[['CharityNo', 'Varformat', 'value']]
df = df.dropna(subset=['CharityNo'])
df = df.drop_duplicates()
This is what we end up with.
For the next step we need to pivot the dataframe to a wide format. This means we need to make it so that the rows in Varformat become columns with values from the Value indexed by CharityNo. You will see what I mean in a second!
df = df.pivot(index='CharityNo', columns='Varformat', values='value')

As you can see, now our variables have turned into actual columns and we have our table!
Finally let’s output our data into a CSV file using
df.to_csv("YOUR/PATH", sep=",", index= False)
And there we go! We now have successfully pulled data from GraphQL API in Python and wrangled it into a useful format! For the full code we used for this, see the full code section. If you need to pull more data that the API allows per single call, you will need to create a loop that will perform multiple calls to pull all the data you need. If you want to know how to do this, read on!
How to Loop Over the API Call
It is clear the single API call on Charitybse has a limit of 30 charities. From our previous outputs we can see there are upwards of 14000 charities that satisfy our filters. This is exactly why we need to write a loop that will pull all of those charities for us. In this case I think it will be easiest if I show you the loop code in its entirety and then go over the most important elements.
import json
import pandas as pd
import requests
from pandas.io.json import json_normalize
from pandas import DataFrame

def flatten_json(y):
    out = {}

    def flatten(x, name=''):
        if type(x) is dict:
            for a in x:
                flatten(x[a], name + a + '_')
        elif type(x) is list:
            i = 0
            for a in x:
                flatten(a, name + str(i) + '_')
                i += 1
        else:
            out[name[:-1]] = x

    flatten(y)
    return out


# running graphql pull

# looping through all the trusts

# setting some loop variables
skipcurrent = 0
totaltrusts = 1 # 10000 limit per key
totaldf = pd.DataFrame()

while skipcurrent <= 9960:

    # set query

    query = """ query {
          CHC {
            getCharities(filters: {
              operations: { every:["302"]}
              causes: {every: ["105"]}
            }) {
              count
              list(limit: 30
              skip: """+str(skipcurrent)+""") {
                id
                names {
                  value
                  primary
                }
                activities
                operations {
                  id, name
                }
                #causes {id, name}
                contact {address, email, phone, postcode, social {
                  platform
                  handle
                }}
                finances {
                  income
                  spending
                }
                registrations {registrationDate, removalDate}
              }
            }
          }
        }
        """

    # print(query) #TESTING PURPOSE

    # set url and request

    url = 'https://charitybase.uk/api/graphql'
    headers = {'content-type': 'application/json',
               "Authorization": "Apikey YOUR KEY"}
    r = requests.post(url, json={'query': query}, headers=headers)
    # print(r.status_code) #TESTING PURPOSE
    # print(r.text) #TESTING PURPOSE

    json_data = json.loads(r.text)

    flat = flatten_json(json_data)
    df_data = json_normalize(flat)
    df = pd.DataFrame(df_data)


    df = pd.melt(df)
    df['CharityNo'] = df.variable.str.extract(pat='list_(\d*)_')
    df['Varformat'] = df.variable.str.extract(pat= 'data_CHC_getCharities_list_[0-9]*._(.*.)')
    df = df[['CharityNo', 'Varformat', 'value']]
    totaltrusts = df.iloc[0,2] # assigning total trust no as parsed
    df = df.dropna(subset=['CharityNo'])
    df = df.drop_duplicates()
    df = df.pivot(index='CharityNo', columns='Varformat', values='value')

    totaldf = pd.concat([totaldf,df])


    skipcurrent = skipcurrent + 30 #updating skip number
    print("Total trust number to pull: "+str(totaltrusts)+" Pulled so far: "+str(skipcurrent))
else:
    print("done")
    print("Pulled total of: "+str(skipcurrent)+" Trusts and Charities")

totaldf.to_csv("YOUR/PATH", sep=",", index= False)
So, we are starting the loop pretty high up in the code, right after we defined the function for flattening JSONs. This is because we will have to change the GraphQL query with each call to ensure we call the next 30 charities in succession with each subsequent call.
Let’s go over the variables we are creating before initiating the loop. First up we have skipcurrent at 0. This variable is a number that will go into the skip setting in GraphQL query. It tells the server to skip the first X charities in results. It is this variable that allows us to pull new 30 charities with each new call.
The next variable is totaltrusts. The variable captures how many trusts there are in total. Initially it is set at zero, but as the loop runs, it will assign the correct value.
Finally, we initiated an empty data frame totaldf. This is the final dataframe to which we will be appending each call. You will see exactly what I mean.
The loop itself is a simple while loop with while component and else component. First, we set the loop to run up until our skipcurrent counter reaches the value of 9960. This seems to be a safe amount of charities to pull without triggering the API key limit.
Then we move onto our GraphQL query where we are including the current skipcurrent value in the skip field. After that the loop runs the API calls as previously. In terms of data wrangling we have a small difference in the form of totaltrusts = df.iloc[0,2] where we obtain the correct total number of trusts, mainly for reporting purposes (since we are limited by the API key limits, rather than total trusts available).
Finally we have the totaldf = pd.concat([totaldf,df])line, where the script appends the data from current call to our running data frame of all charities pulled so far. At subsequent point script also updates skipcurrent value.
Print function is there simply for reporting purposes so we can see the loop running in all its satisfying glory!
In the else component of the loop we are ending the loop and reporting as much with Print functions.
Outside the loop, the final command saves our totaldf to CSV.
Voila! Now we have a loop running the repeated API calls and pulling tons of data for us with a single push of a button!
Full GraphQL in Python Codes
So, we managed to successfully develop a GraphQL API call in Python and create a loop to make multiple API calls that will get us the data we need! We did this by working through GraphQL API of Charitybase, however, you should be able to follow these steps to use any API that uses GraphQL. The key here is to fully understand the necessary headers, API keys and of course the GraphQL query structure known as schema.
As promised, see the full scripts we used below! If you have any questions, stick them in comment section below and I will help you!
Single Call Code
import json
import pandas as pd
import requests
from pandas.io.json import json_normalize
from pandas import DataFrame

def flatten_json(y):
    out = {}

    def flatten(x, name=''):
        if type(x) is dict:
            for a in x:
                flatten(x[a], name + a + '_')
        elif type(x) is list:
            i = 0
            for a in x:
                flatten(a, name + str(i) + '_')
                i += 1
        else:
            out[name[:-1]] = x

    flatten(y)
    return out


# running graphql pull

# set query

query = """ query {
  CHC {
    getCharities(filters: {
      operations: { every:["302"]}
      causes: {every: ["105"]}
    }) {
      count
      list(limit: 30
      skip: 0) {
        id
        names {
          value
          primary
        }
        activities
        operations {
          id, name
        }
        #causes {id, name}
        contact {address, email, phone, postcode, social {
          platform
          handle
        }}
        finances {
          income
          spending
        }
        registrations {registrationDate, removalDate}
      }
    }
  }
}
"""

print(query)

# set url and request

url = 'https://charitybase.uk/api/graphql'
headers = {'content-type': 'application/json',
           "Authorization": "Apikey YOUR KEY"}
r = requests.post(url, json={'query': query}, headers=headers)
print(r.status_code)
print(r.text)

json_data = json.loads(r.text)
flat = flatten_json(json_data)
df_data = json_normalize(flat)
df = pd.DataFrame(df_data)


df = pd.melt(df)
df['CharityNo'] = df.variable.str.extract(pat='list_(\d*)_')
df['Varformat'] = df.variable.str.extract(pat= 'data_CHC_getCharities_list_[0-9]*._(.*.)')
df = df[['CharityNo', 'Varformat', 'value']]
df = df.dropna(subset=['CharityNo'])
df = df.drop_duplicates()
df = df.pivot(index='CharityNo', columns='Varformat', values='value')


df.to_csv("YOUR/PATH", sep=",", index= False)
Looped Code
import json
import pandas as pd
import requests
from pandas.io.json import json_normalize
from pandas import DataFrame

def flatten_json(y):
    out = {}

    def flatten(x, name=''):
        if type(x) is dict:
            for a in x:
                flatten(x[a], name + a + '_')
        elif type(x) is list:
            i = 0
            for a in x:
                flatten(a, name + str(i) + '_')
                i += 1
        else:
            out[name[:-1]] = x

    flatten(y)
    return out


# running graphql pull

# looping through all the trusts

# setting some loop variables

skipcurrent = 0
totaltrusts = 1 # 10000 limit per key
totaldf = pd.DataFrame()

while skipcurrent <= 9960:

    # set query

    query = """ query {
          CHC {
            getCharities(filters: {
              operations: { every:["302"]}
              causes: {every: ["105"]}
            }) {
              count
              list(limit: 30
              skip: """+str(skipcurrent)+""") {
                id
                names {
                  value
                  primary
                }
                activities
                operations {
                  id, name
                }
                #causes {id, name}
                contact {address, email, phone, postcode, social {
                  platform
                  handle
                }}
                finances {
                  income
                  spending
                }
                registrations {registrationDate, removalDate}
              }
            }
          }
        }
        """

    # print(query) #TESTING PURPOSE

    # set url and request

    url = 'https://charitybase.uk/api/graphql'
    headers = {'content-type': 'application/json',
               "Authorization": "Apikey YOUR KEY"}
    r = requests.post(url, json={'query': query}, headers=headers)
    # print(r.status_code) #TESTING PURPOSE
    # print(r.text) #TESTING PURPOSE

    json_data = json.loads(r.text)

    flat = flatten_json(json_data)
    df_data = json_normalize(flat)
    df = pd.DataFrame(df_data)


    df = pd.melt(df)
    df['CharityNo'] = df.variable.str.extract(pat='list_(\d*)_')
    df['Varformat'] = df.variable.str.extract(pat= 'data_CHC_getCharities_list_[0-9]*._(.*.)')
    df = df[['CharityNo', 'Varformat', 'value']]
    totaltrusts = df.iloc[0,2] # assigning total trust no as parsed
    df = df.dropna(subset=['CharityNo'])
    df = df.drop_duplicates()
    df = df.pivot(index='CharityNo', columns='Varformat', values='value')

    totaldf = pd.concat([totaldf,df])


    skipcurrent = skipcurrent + 30 #updating skip number
    print("Total trust number to pull: "+str(totaltrusts)+" Pulled so far: "+str(skipcurrent))
else:
    print("done")
    print("Pulled total of: "+str(skipcurrent)+" Trusts and Charities")

totaldf.to_csv("YOUR/PATH", sep=",", index= False)